Instructions
Pica Press build guide
Printing recommendations, file preparation, and step-by-step assembly for your Pica Press.
The 3D printed Pica Press is a passion project to bring one of my absolutely favourite types of presses to as many printmakers as possible. I fell in love with the proofing press from the first time I ran a Vandercook SP15. I wanted to create something for home for my lino cut printing that gave me the same amazing experience of a consistent pressure, and print quality. I have been around 3D printing and CAD design for about 10 years and it felt like time to create my perfect little table top press.
This is part of Printmakers Matrix, a project run by Ashley Andrews and Justin Holt. Printmakers Matrix is a community site that runs monthly print contests any printmaker can join. All contests are voted on by the community and are free to join at any skill level.
3D printing recommendations
For this large-scale project, we recommend using a CoreXY 3D printer, such as the Bambu Lab, Creality K, or FlashForge Adventurer series. We currently use a FlashForge Adventurer 5M Pro. These printers are ideal because the print bed moves only vertically, avoiding issues with bed-slinger styles when printing tall components without supports. Additionally, the high print speeds of CoreXY machines are beneficial for this extensive project, which can require over 24 hours of printing.
For filament it is recommended to use PLA as this makes glueing easy. PLA works with CA Glue (Super Glue). Other filaments like ABS will require a special adhesive. Please note with PLA do not leave this press in outdoor sunny conditions or in your car for too long. PLA can warp in warm temperatures.
Filament requirements
- 2× 1 kg rolls of filament
Other tools
- Rubber mallet or hammer
- Sand paper (in case the fitment for the large bearings is too tight)
Instructions for 3MF file
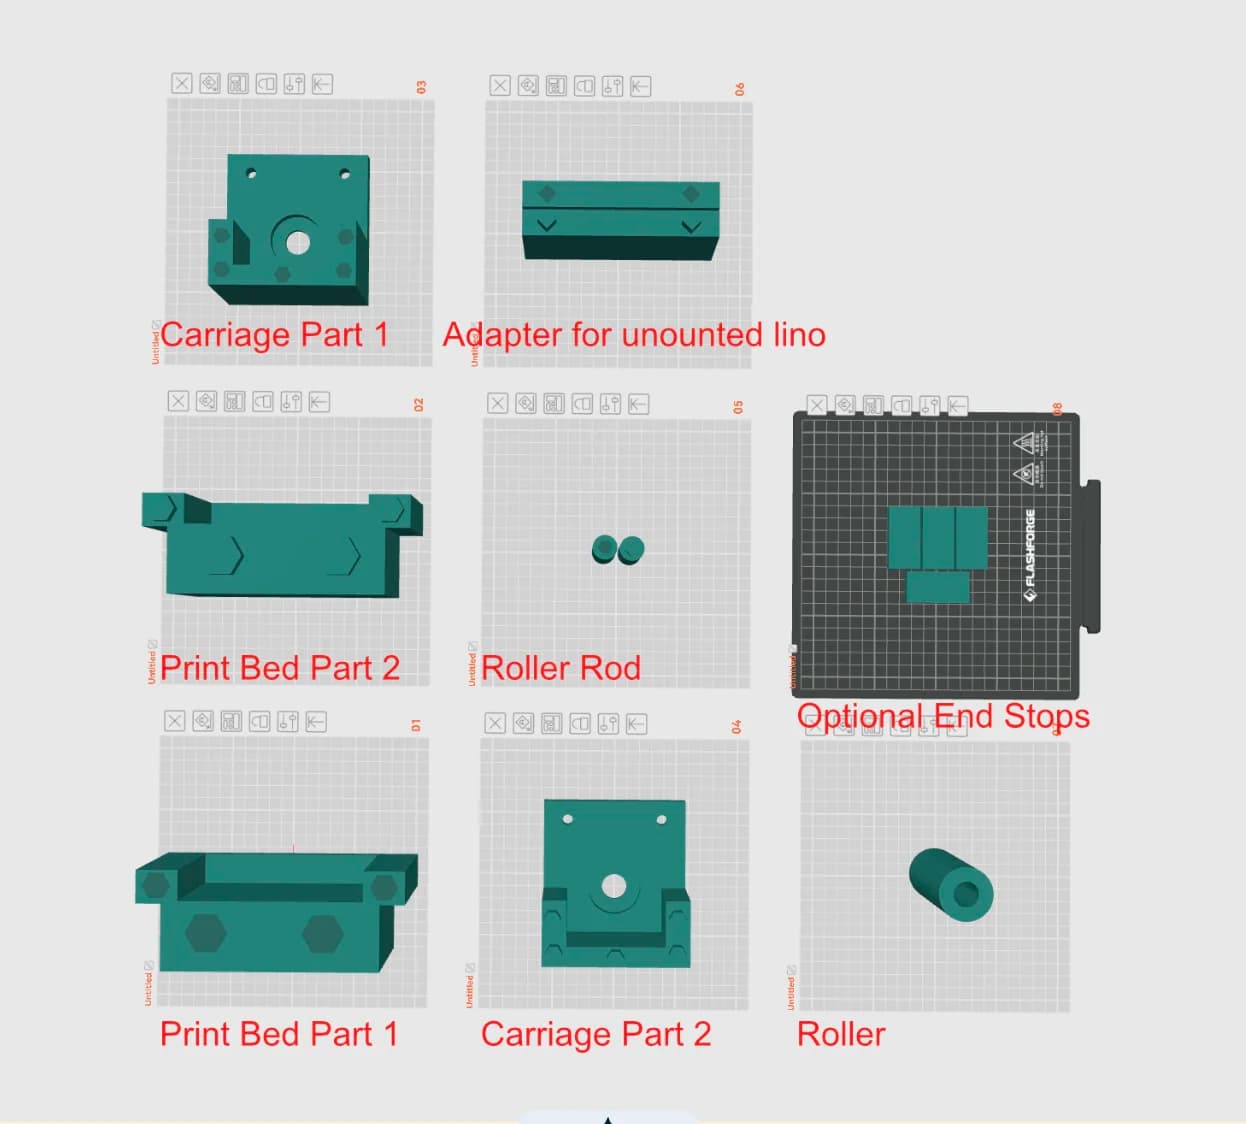
We recommend using the 3MF files whenever your slicer supports them. The pegs are already prepared and the splitting of parts is already done for printers with a 220 × 220 × 200 mm build volume or larger, so you can go straight to printing without extra setup.
Open the 3MF file in your printer's slicer, if supported.
All files will have their connectors and plates laid out for printing.
Instructions for STL files
Use the STL files only if your slicer does not support 3MF. The 3MF package is the easier route — pegs are pre-cut and parts are already split for 220 × 220 × 200 mm beds and larger.
For the stand-alone STL files:
Create a plate with each STL file.
For the print bed, roller post and carriage files you may need to split these files using your slicer.
If that is the case, in the split feature the connector functions to create plugs. We use the prism style, with the hexagon shape. These will help with alignment for glueing.
Required hardware
In addition to the 3D printed parts, you will need the following hardware to complete your Pica Press. A full bill of materials is also included in the 3MF and STL download packages above.
- 4
8 × 22 × 7 mm ball bearings (608-2RS)
What we used: PGN 608-2RS
- 2
20 × 42 × 12 mm ball bearings (6004 ZZ C3)
What we used: PGN 6004 ZZ C3
- 4
5/16" × 1-1/2" hex bolts
- 4
5/16" flat washers
- 8
5/16" hex nuts
What we used: A hardware set that includes bolts, washers, and nuts together (sets of 10)
Super glue
What we used: Super glue (for assembly)
Assembly instructions
The roller
Glue your roller core rod together and allow it to dry.
The core will just fit into the roller. Center the roller onto the core rod.
The carriage
Press fit the 2× PGN ball bearings into the corresponding holes. If the hole is too tight, a little bit of sand paper and a rubber mallet come in handy.
Add the smaller ball bearings to the hex head bolts. The head of the bolt will be on the inside of the carriage. Put a ball bearing on, then a washer and then 1 nut. Slip through the hole and add another nut to lock into place. Do this for all 4 holes on the carriage.
With the bearings installed, install the roller and core while pressing the two halves of the carriage together. Add a little bit of super glue to the flat surfaces and on the plugs. Press fit the two halves together making sure the rod for the roller is inserted into both larger ball bearings. Set aside to dry.
The print bed
Put super glue on the plugs and flat surfaces that will be touching.
Press fit the two parts of the bed together and set aside to dry.
Do the same for the linocut bed insert if you want to use this.
Final assembly
Slide the carriage onto the rails on the side of the print bed. When sliding the back bearings on there may be a tiny bit of resistance, but will pop under the rails. Your Pica Press is now ready to be used!
Optional: end stops
You can optionally glue end stops to the four corners at the ends of the rails to keep the carriage from rolling off. This is entirely optional — some people prefer end stops on both ends, while others leave them off so the roller can be removed easily. We recommend fitting end stops on one end only, so you can slide the carriage off to clean the roller if you get ink on it by mistake.
Happy printing!